Raspberry Pi Pico Robot in Micropython
How the new $4 Pico microcontroller can power a new generation of teaching robots for coding clubs.

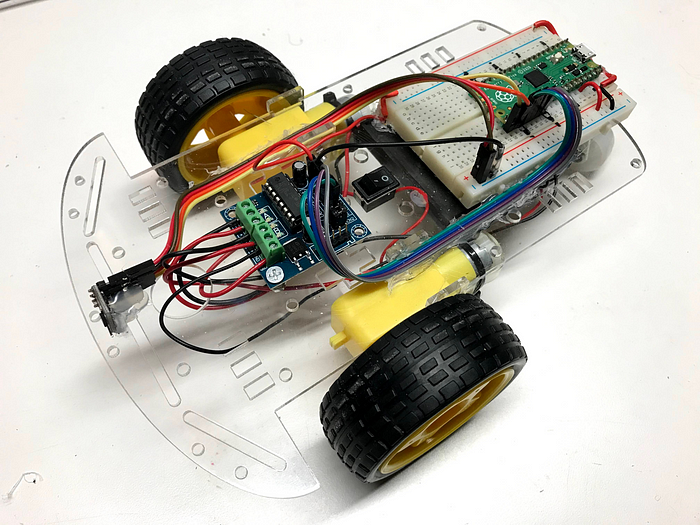
I finally got some time this weekend to test our new Raspberry Pi Pico-powered collision avoidance robot. This blog describes the robot and some of the design considerations to make sure this robot is a stable platform for sustainable robotics labs for CoderDojo coding clubs.
Design Considerations
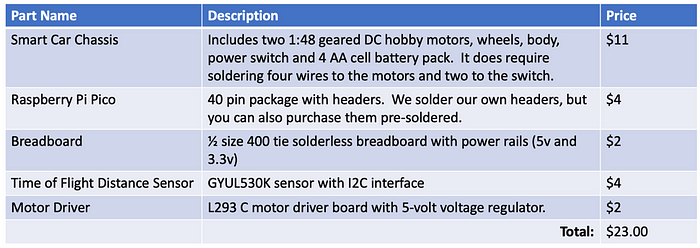
We want this robot to be the foundation of many other robots. They will extend this base design using the breadboard. We want to keep the costs low (currently under about $25) using easy-to-purchase generic parts.

We also want to keep an open architecture with a 400-tie solderless breadboard so that students can easily add sensors, buttons, and displays as well as upgrade the entire processor and more powerful ones become available. This gives us a higher sustainability score for this design. A more detailed spreadsheet with the parts list is available in a Google sheet here.
Time of Flight Distance Sensor
Most of our prior robots used the ubiquitous HC-SR04 ultrasonic ping sensors that you can purchase for around $3 on eBay. This version upgrades the ping sensor to use the newer high-quality VL53L0X time-of-flight laser distance sensor which I have found gives high-quality reading up to 1.2 meters away even as the battery voltage drops. It costs about $4.

The VL53L0X time-of-flight sensor is a relatively new low-cost sensor that I have just started using. Unlike the ultrasonic ping sensors that measure the time an ultrasonic ping returns the sensor, this sensor used light pulses. Recalling from our physics class that light travels about one foot per nanosecond, you can see that the clock circuits in these devices are truly amazing.
One item to note, the sensor should be pointed up about 5% to avoid catching reflections off a shiny surface on the floor. This takes just a bit of adjusting.
Solderless Breadboard Connections
We mount the Raspberry Pi Pico directly on the top of the chassis on a breadboard that is attached to the plexiglass chassis. It requires just two power connections (3.3v and 5v in), ground (row 3), four PWM connections, and two connections for the I2C bus to get distance data from the sensor.

Note that we put the USB connector on the back so it is easy to connect to your computer to program.
Motor Controller
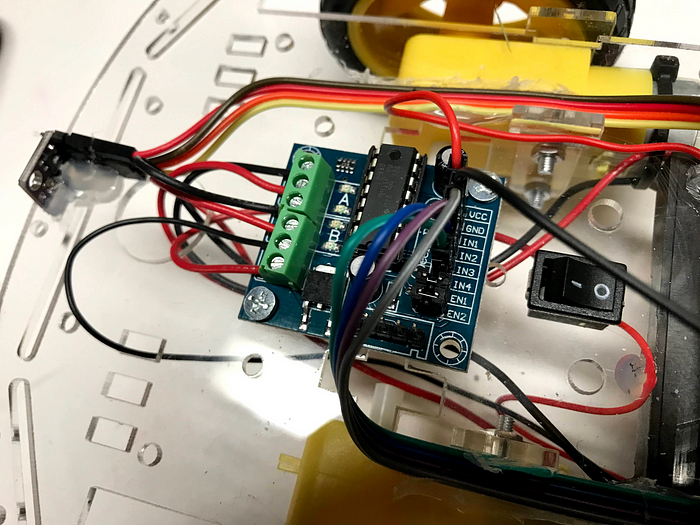
For this robot, we selected the ubiquitous L293D motor controller. This board with a voltage regulator and screw-on headers is available on eBay for under $2.

The board takes in four PWM signals: two for each of the two motors. One is a forward speed signal and the other is a reverse speed signal.
Power
We are powering the robot with 4 AA batteries for a 6-volt DC power source. The motor driver has a voltage regulator that drops the voltage to about 5 volts. As the batteries wear down the voltage will drop and when the voltage to the Pico drops below 3.3 volts the robot will become unreliable.

Both the Pico and the time-of-flight distance sensor could run on a 3.3v source, but I could not locate a driver board for under $2 that has a 3.3v output voltage. All the old Arduinos used 5 volts and so all the low-cost parts also used 5-volt standards. This is really a problem since all the new microcontrollers (ESP-32 and Pico) all use 3.3-volt power supplies. If we had a 3.3v regulator on our motor driver the robot could work using a rechargeable 5v lithium power pack, which would further improve our sustainability score. Please let me know if you can help me source one of these.
Programming the Robot in Python
Unlike our previous generations of low-cost robots that were based on Arduino and C, the Raspberry Pi Pico is fully programmed in Python. Python is now by far the favorite language of our students.
Below is a simplified version of our main event loop:
while True:
   dist = read_sensor()
   if dist < TURN_THRESHOLD:
      print('object detected')
      reverse()
      sleep(BACKUP_TIME)
      turn_right()
      sleep(TURN_TIME)
   else:
      forward()
Most of our 10–12-year-old Python students have learned Python using web-based programming tools like trinket.io. They will feel right at home with this code.
You can see the detailed documentation for the robot at the CoderDojo Twin Cities Micropython site here. If you find any bugs or would like to create an enhancement please add a new GitHub issue.
